Kia Sportage: SRSCM / Side Impact Sensor (SIS) Repair procedures
Kia Sportage QL (2015-2026) Service Manual / Restraint / SRSCM / Side Impact Sensor (SIS) Repair procedures
| Removal |
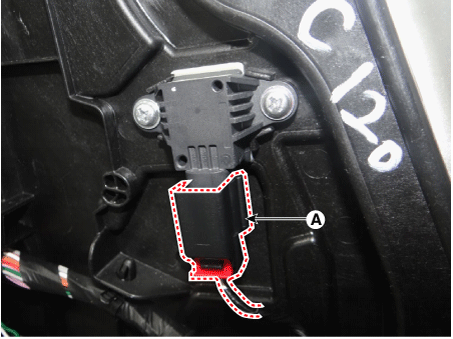
Pressure side impact sensor (P-SIS)
| 1. |
Disconnect the battery negative terminal, and wait for at least thirty
seconds before beginning work.
|
| 2. |
Remove the front door trim.
(Refer to Body (Interior and Exterior) - "Front Door Trim")
|
| 3. |
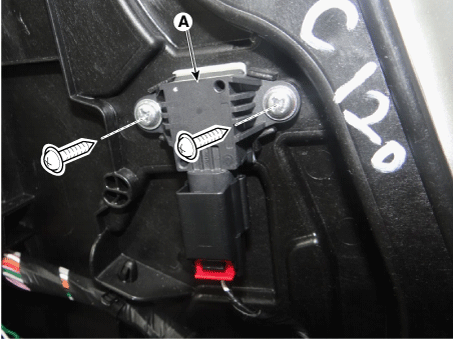
Remove the pressure side impact sensor (A).
|
| 4. |
Loosen the side pressure sensor mounting screw, and remove the sensor
(A).
|
Front Gravity side impact sensor (G-SIS)
| 1. |
Disconnect the battery negative terminal, and wait for at least thirty
seconds before beginning work.
|
| 2. |
Remove the door scuff trim.
(Refer to Body (Interior and Exterior) - "Interior Trim")
|
| 3. |
Remove the center pillar trim.
(Refer to Body (Interior and Exterior) - "Interior Trim")
|
| 4. |
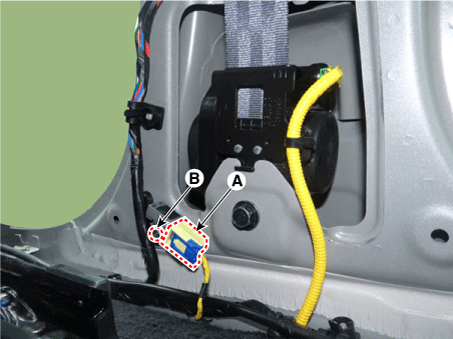
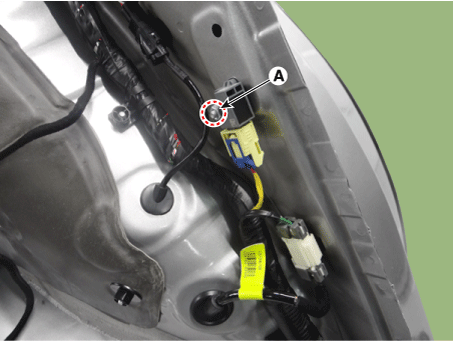
After disconnecting the side impact sensor connector (A) and loosening
the bolt(B), remove the sensor.
|
Rear side impact sensor (R-SIS)
| 1. |
Disconnect the battery negative terminal, and wait for at least thirty
seconds before beginning work.
|
| 2. |
Remove the rear seat.
(Refer to Body (Interior and Exterior) - "Rear seat")
|
| 3. |
Remove the rear side impact sensor connect (A).
|

| 4. |
Loosen the rear side impact sensor nut(A), and remove the sensor.
|
| Installation |
Pressure side impact sensor (P-SIS)
| 1. |
Disconnect the battery negative terminal, and wait for at least thirty
seconds before beginning work.
|
| 2. |
Install a pressure side impact sensor screws.
|
| 3. |
Connect the pressure side impact sensor.
|
| 4. |
Install the front door trim.
(Refer to Body (Interior and Exterior) - "Front door trim")
|
| 5. |
Reconnect the battery negative terminal.
|
| 6. |
After installing the pressure side impact sensor, confirm proper system
operation:
• Turn the ignition switch ON; the SRS indicator light should be turned
on for about six seconds and then go off.
|

Front Gravity side impact sensor (G-SIS)
| 1. |
Disconnect the battery negative terminal, and wait for at least thirty
seconds before beginning work.
|
| 2. |
Connect the side impact sensor connector (A) and then tighten the bolt
(B).
|
| 3. |
Install the front door trim.
(Refer to Body (Interior and Exterior) - "Front door trim")
|
| 4. |
Reconnect the battery negative terminal.
|
| 5. |
After installing the side impact sensor, confirm proper system operation:
• Turn the ignition switch ON; the SRS indicator light should be turned
on for about six seconds and then go off.
|
Rear side impact sensor (R-SIS)
| 1. |
Disconnect the battery negative terminal, and wait for at least thirty
seconds before beginning work.
|
| 2. |
Install the rear side impact sensor nut (A).
|
| 3. |
Connect the rear side impact sensor (A).
|
| 4. |
Install the rear seat.
(Refer to Body (Interior and Exterior) - "Rear seat")
|
| 5. |
Reconnect the battery negative terminal.
|
| 6. |
After installing the side impact sensor, confirm proper system operation:
Turn the ignition switch ON; the SRS indicator light should be turned
on for about six seconds and then go off.
|
 Side Impact Sensor (SIS) Components and components location
Components
1. Pressure side impact sensor
(P-SIS)
2. Rear Gravity Side Impact Sensor (R-SIS)
3. Front Gravity Side Impact
Sensor (G-SIS)
...
 Seat Belt Buckle Switch (BS) Description and operation
Description
The SRSCM shall monitor the status of the driver and front passenger seat belt
buckle. The SRSCM provides one pin each for the driver and front passenger seat
belt bu ...
Other information:
Kia Sportage QL (2015-2026) Owners Manual: Icy Road Warning Light (if equipped)
This warning light is to warn the driver the road may be icy. When the following conditions occur, the warning light (including Outside Temperature Gauge) blinks 5 times and then illuminates, and also warning chime sounds once. - The temperature on the Outside Temperature Gauge is below approx ...
Kia Sportage QL (2015-2026) Owners Manual: Tire terminology and definitions
Air Pressure: The amount of air inside the tire pressing outward on the tire. Air pressure is expressed in kilopascal (kPa) or pounds per square inch (psi). Accessory Weight: This means the combined weight of optional accessories. Some examples of optional accessories are, automatic transaxle, ...
Copyright © www.ksportagegl.com 2015-2026
