Kia Sportage: Engine Control System / Variable Charge Motion Actuator (VCMA) Repair procedures
| 1. |
Turn the ignition switch off and disconnect the battery (-) terminal.
|
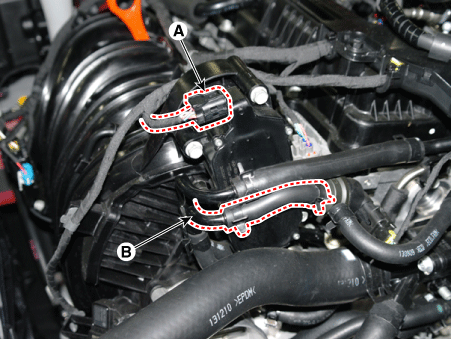
| 2. |
Remove variable charge motion actuator connector (A) and three mounting
bolts.
|
| 3. |
Remove intake manifold vacuum pipe (B) in order to secure work space.
|
| 4. |
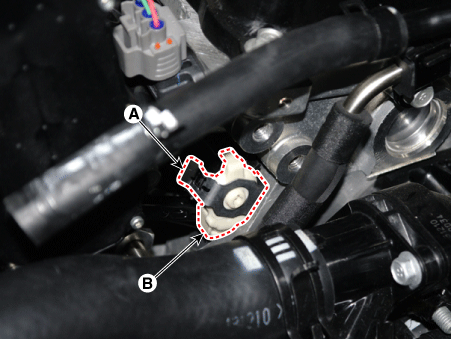
Remove VCMA rod clip (A) and connection link between flap (B) using
screwdriver.
|
VCMA connection link can be damaged. So, make sure to remove
it in a horizontal direction.
Make sure that groove part of the connection link (C) is pointing
upward when mounting VCMA.
|
|
| 1. |
Install in the reverse order of removal.
|
Make sure that groove part of the connection link is pointing
upward when mounting VCMA.
|
|
|
Variable Charge Motion Actuator (VCMA) mounting bolt :
9.8 - 11.8 N·m (1.0 - 1.2 kgf·m, 7.2 - 8.7 lb·ft)
|
|
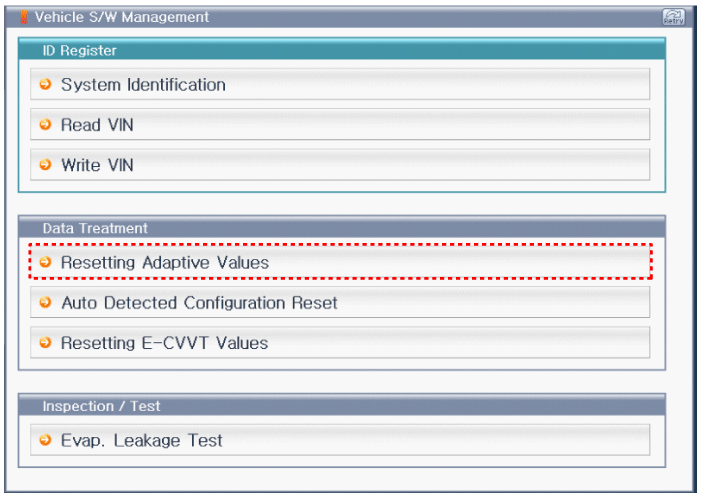
After replacing the VCMA (Variable Charge Motion Actuator) or intake
manifold, be sure to delete the previous VCMA adative value by performing
the 'resetting adaptive values' procedure using KDS/GDS.
|
|
VCMA learning procedure is performed automatically while driving but
manual learning procedure is also available for immediate access to
proper operation.
| 1) |
Push the accelerator pedal at 2,500 engine rpm for 2-3 seconds
and then idle the engine.
|
| 2) |
Repeat the no. 1 procedure three times.
|
| 3) |
Switch "OFF" the ignition.
|
|
| 1. |
Switch "OFF" the ignition.
|
| 2. |
Connect the KDS/GDS to Data Link Connector (DLC).
|
| 3. |
Switch "ON" the ignition.
|
| 4. |
Select "Vehicle, Model year, Engine, System".
|
| 5. |
Select "Vehicle S/W Management".
|
| 6. |
Delete the previous VCMA adaptive value by selecting "Resetting Adaptive
Values".
|
| 7. |
Press [Reset] when ready.
|
Circuit Diagram
Harness Connector
...
Components
Appearance of E-CVVT is similar to that of hydraulic CVVT. Connector that drives
DC motor and protection cover that protects the motor are mounted on the upper
part. D ...
Other information:
Specification
Item
Specification
Ultrasonic sensor
Voltage rating
DC 12 V
Detecting range
11.8 - 47.2 in. (30 - 120 cm)
Operation voltage
DC 9 - 16 V
...
Power Flow Chart
P, N
UD/B
LR/B
26/B
35R/C
OD/C
OWC
●
▣ Direction of Rotation
▶Lower & ...


 Variable Charge Motion Actuator (VCMA) Schematic diagrams
 E-CVVT motor Components and components location