Kia Sportage: Assist Emergency Braking(AEB) System / Repair procedures
Kia Sportage QL (2015-2026) Service Manual / Brake System / Assist Emergency Braking(AEB) System / Repair procedures
| Inspection |
AEB function ON / OFF switch was included to USM (User Setting Menu) and the
state of the factory is ON.
When the IGN On, maintain ON condition by default. And does not reflect the
driver settings when next IGN On.
If turned the ESC function Off, the AEB function is turned off.
| – |
The ON/OFF for AEB is included in the USM (User Setting Menu) and the
default is ON.
|
| – |
While IGN is On, it stays at ON, however, the driver's settings do not
last next time when IGN is newly On.
|
| – |
When VDC is Off, AEB is also turned Off.
|
| Removal |
| 1. |
Turn the ignition switch off and disconnect the battery (-) terminal.
|
| 2. |
Remove the front bumper cover
(Body - Refer to the "front bumper")
|
| 3. |
Remove the front bump low stiffener assembly.
|
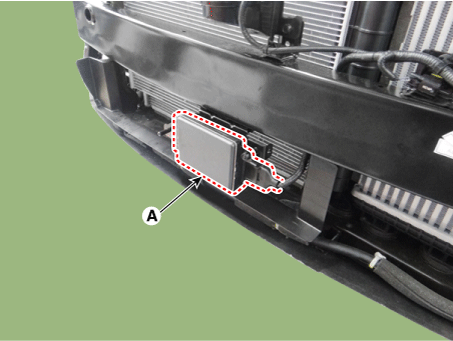
| 4. |
Disconnect the AEB radar connector (A).
|
LDWS camera
AEB, contrary to SCC (Smart Cruise Control) has to work on a stationary car
so the system uses the Fusion Target system to combine radar and camera.
| 1. |
Disconnect the battery (-) cable.
|
| 2. |
Remove the camera.
(Refer to Body Electrical System - "Lane Departure Warning System (LDWS)")
|
| Installation |
AEB radar
| 1. |
Installation is the reverse of removal.
|
| 2. |
Perform AEB variant coding
|
| 3. |
Perform the AEB radar alignment.
|
LDWS camera
| 1. |
Installation is the reverse of removal.
|
| 2. |
Perform Service Point Target Auto Calibration (SPTAC).
(Refer to Body Electrical System - "Lane Departure Warning System (LDWS)")
|
| Adjust the alignment |
When to perform the AEB radar alignment
| • |
When you remount the radar after removing it.
|
| • |
When you mount a new product.
|
| • |
When the sensor or the surrounding part received a strong impact after
a light collision.
|
| • |
When it cannot detect a preceding car while driving.
|
| • |
When you replaced or null-adjusted the steering angle sensor (SAS).
|
Things to do before a sensor alignment.
|

Alignment adjusting
|
No. |
Process |
Description |
|
1 |
Mounting the sensor |
• Mount the radar sensor on the proper position of the vehicle bumper.
(Check if the bracket or radar is damaged.) |
|
2 |
Keep the car stationary. |
• Fix the car on a lift or a flat surface to maintain the car's horizontality
with the ground. |
|
3 |
Checking the car |
• Make sure the interior of the car is empty (including the trunk). |
|
• Check if the front of the radar is clean. |
||
|
• Check the allowed tire pressure and suspension. |
||
|
• Check the radar sensor is correctly mounted and wired. |
||
|
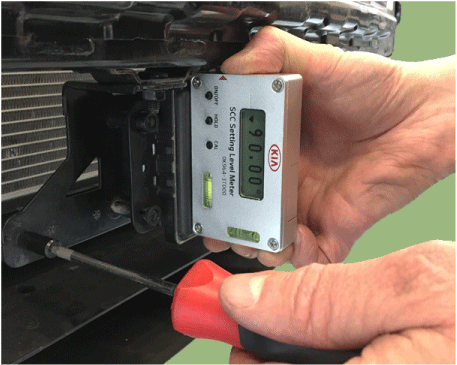
4 |
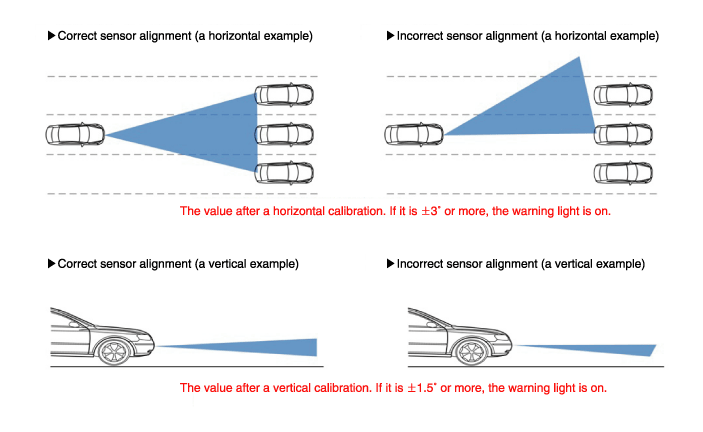
Calibrating the vertical angle (by a level meter) |
• Use a digital meter to measure the alignment. If necessary, adjust the
screw to calibrate the angle (allowance of vertical angle: ±1.5° or less). |
|
5 |
Calibrating the horizontal angle (driving) |
1) Turn the Ignition on (Red light should be on.). |
|
2) Use the GDS diagnosis equipment and start alignment. |
||
|
3) After the startup, drive the car at 50kph (30mph) or faster for five
minutes. |
||
|
4) If the alignment is complete while driving, the warning light on the
cluster is turned off. |
||
|
6 |
Check if the alignment is complete. |
• The alignment has been completed through the horizontal automatic
alignment. (If the warning light is on after the alignment is done, check if the bracket or vehicle body is damaged.) |
|
Adjusting the radar sensor
| [Vertical calibration] |
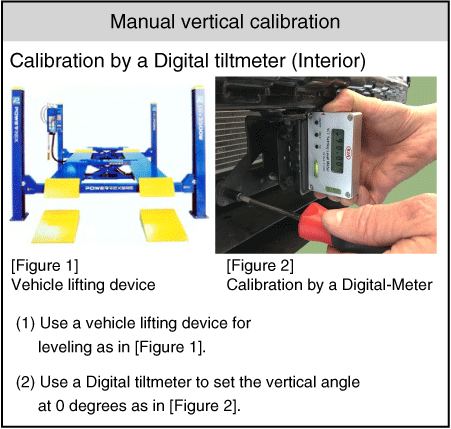
Use an electronic tiltmeter for vertical alignment of the sensor, if
not available, use a Bubble Meter.
Adjusting the screw for vertical alignment
|
| [Horizontal calibration] |
| 1. |
For horizontal alignment of the sensor, access GDS and select AEB while
the vehicle is turned on
|
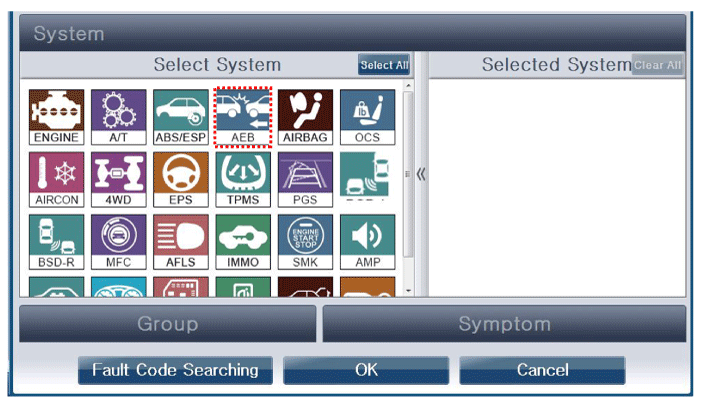
| 2. |
Select the AEB calibration.
|
| 3. |
Select C2.
|
| 4. |
Perform the alignment of the driving mode sensor before driving. On
the console, check if the red warning light is On.
|

| 5. |
When the sensor alignment is complete, the warning light on the console
is turned off.
|
| 6. |
Check if the alignment is complete.
|
 Schematic diagrams
Schematic diagram
Terminal Function
NO.
Terminal function
1
B+
2
NC
...

Other information:
Kia Sportage QL (2015-2026) Owners Manual: Engine compartment
■ Gasoline Engine (Gamma 1.6 - GDI) ■ Gasoline Engine (Gamma 1.6 - TGDI) 1. Engine coolant reservoir 2. Engine oil filler cap 3. Brake/clutch fluid reservoir 4. Air cleaner 5. Fuse box 6. Negative battery terminal 7. Positive battery terminal 8. Engine oil dipstick 9.Windshield was ...
Kia Sportage QL (2015-2026) Owners Manual: Headlamp (High/Low beam) bulb replacement
1. Open the hood. 2. Remove the headlamp bulb cover by turning it counterclockwise. 3. Disconnect the headlamp bulb socket-connector. 4. Remove the bulb-socket from the headlamp assembly by turning the bulb-socket counterclockwise until the tabs on the bulb-socket align with the slots on the ...
Copyright © www.ksportagegl.com 2015-2026
