Kia Sportage: Fuel Filler Door / Description and operation
Kia Sportage QL (2015-2026) Service Manual / Body Electrical System / Fuel Filler Door / Description and operation
| Description |
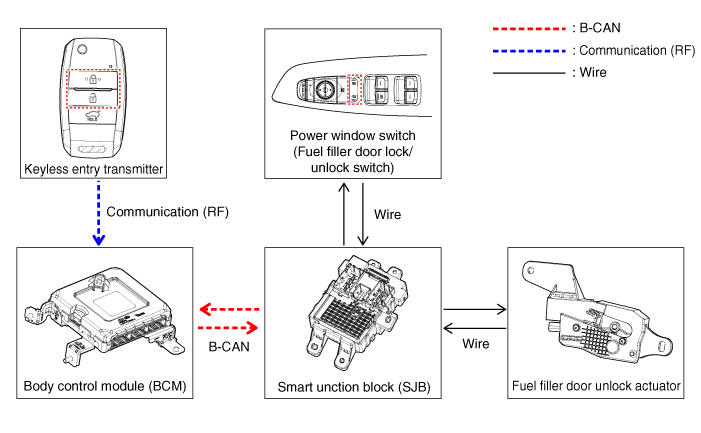
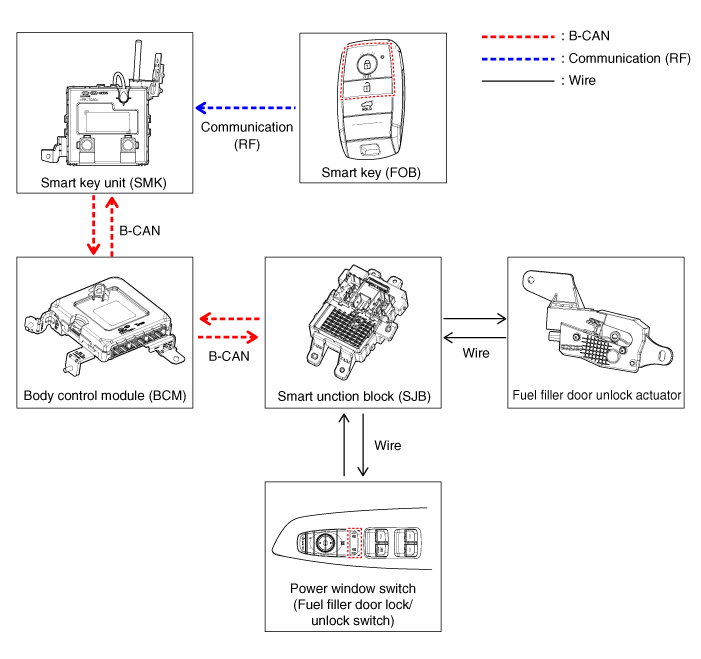
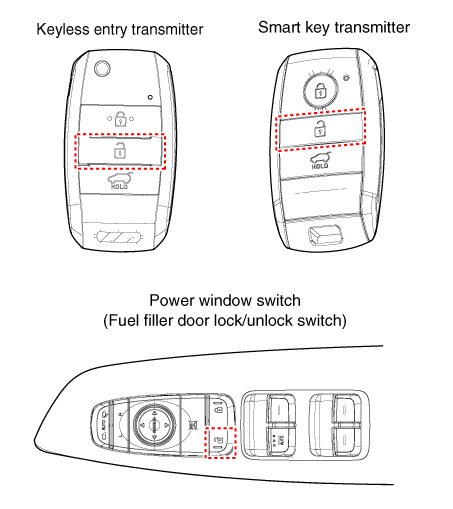
Fuel filler door lock/unlock switch
There is no seprate lock/unlock switch for fuel filler door.
It is operated in association with lock/unlock of all doors by power door lock
switch and keyless entry transmitter/smart key transmitter.
System Configuration Diagram
| [Keyless Entry Transmitter Type] |
| [Smart Key Transmitter Type] |
Fuel filler door opening procedure
| 1. |
The fuel filler door actuator is released when unlock button is pressed
by power door unlock switch.
|
| 2. |
After unlocking the fuel filler door, press the surface in the "3 o'clock
direction" of fuel filler door to open the door.
|

Automatic unlock of fuel filler door by USM
| • |
USM item -> User setting -> Door/tailgate -> Automatic unlock (Can differ
according to vehicle specifications)
|
| – |
OFF : Releases automatic door unlock setting
|
| – |
During power off/Without key: The door is automatically unlocked by
removing ignition key or switching "OFF" the ignition.
|
| – |
Unlocking driver seat: All doors are automatically unlocked when driver
side door is unlocked.
|
| – |
When moving: Doors are unlocked when the gear is shifted to "P (Parking)".
|

 Components and components location
Component Location
1. Fuel filler door lock/unlock
switch
2. Smart junction block (SJB)
3. Fuel filler door unlock actuator
...
 Fuel Filler Door Unlock Actuator Repair procedures
Removal
1.
Disconnect the negative (-) battery terminal.
2.
Remove the left luggage side trim.
(Refer to body - "Luggage S ...
Other information:
Kia Sportage QL (2015-2026) Owners Manual: Headrest
The rear seat is equipped with headrests in all the seating positions for the occupant's safety and comfort. The headrest not only provides comfort for passengers, but also helps protect the head and neck in the event of a collision. For maximum effectiveness in case of an accident, the ...
Kia Sportage QL (2015-2026) Service Manual: Coil Spring Repair procedures
Removal 1. Remove wheel nuts, wheel and tire (A) from hub. Tightening torque: 107.9 - 127.5 N·m (11.0 - 13.0 kgf·m, 79.6 - 94.0 lb·ft) ...
Copyright © www.ksportagegl.com 2015-2026
