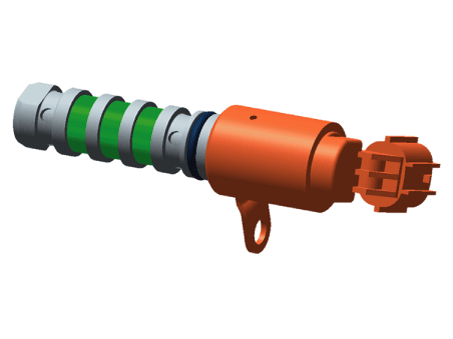
Kia Sportage: Engine Control System / CVVT Oil Control Valve (OCV) Description and operation
Kia Sportage QL (2015-2026) Service Manual / Engine Control / Fuel System / Engine Control System / CVVT Oil Control Valve (OCV) Description and operation
| Description |
Continuous Variable Valve Timing (CVVT) system advances or retards the valve
timing of the exhaust valve in accordance with the ECM control signal which
is calculated by the engine speed and load.
By controlling CVVT, the valve over-lap or under-lap occurs, which makes better
fuel economy and reduces exhaust gases (NOx, HC) and improves engine performance
through reduction of pumping loss, internal EGR effect, improvement of combustion
stability, improvement of volumetric efficiency, and increase of expansion work.
This system consist of
-the CVVT Oil Control Valve (OCV) which supplies the engine oil to the cam phaser
or cuts the engine oil from the cam phaser in accordance with the ECM PWM (Pulse
With Modulation) control signal,
-and the Cam Phaser which varies the cam phase by using the hydraulic force
of the engine oil.
The engine oil getting out of the CVVT oil control valve varies the cam phase
in the direction (Intake Advance/Exhaust Retard) or opposite direction (Intake
Retard/Exhaust Advance) of the engine rotation by rotating the rotor connected
with the camshaft inside the cam phaser.

 CVVT Oil Control Valve (OCV) Specifications
Specification
Item
Specification
Coil Resistance (Ω)
6.9 - 7.9 [20°C(68°F)]
...
 CVVT Oil Control Valve (OCV) Schematic diagrams
Circuit Diagram
Terminal Information
Terminal Illustration
Terminal Function
No.
Function
Connected ...
Other information:
Kia Sportage QL (2015-2026) Service Manual: Seat Heater Schematic diagrams
Circuit Diagram Front Seat Heater Rear Seat Heater ...
Kia Sportage QL (2015-2026) Owners Manual: If you do decide to pull a trailer
Here are some important points if you decide to pull a trailer: Consider using a sway control.You can ask a hitch dealer about sway control. Do not do any towing with your vehicle during its first 1,200 miles (2,000 km) in order to allow the engine to properly break in. Failure to heed this ...
Copyright © www.ksportagegl.com 2015-2026

