Kia Sportage: Audio / Audio Unit Repair procedures
Kia Sportage QL (2015-2026) Service Manual / Body Electrical System / Audio / Audio Unit Repair procedures
| Removal |
|
| 1. |
Disconnect the negative (-) battery terminal.
|
| 2. |
Remove the center fascia upper panal.
(Refer to Body - "Center Fascia Panel")
|
| 3. |
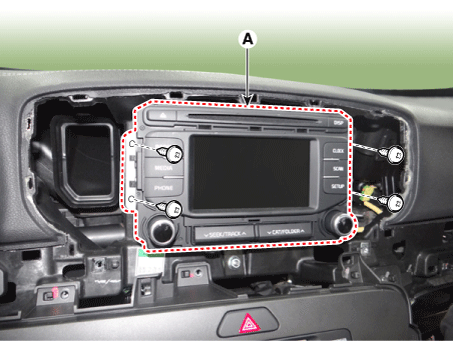
Remove the audio head unit (A) after loosening the screws.
|
| 4. |
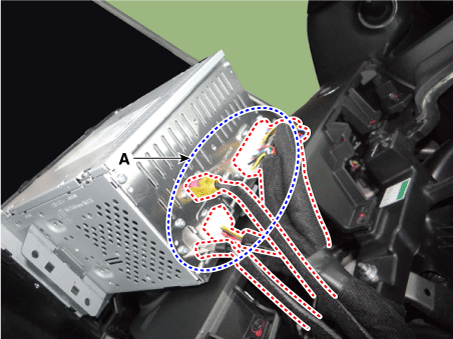
Remove the audio head unit after disconnecting the connectors and antenna
cable (A).
|
| Installation |
| 1. |
Connect the audio unit connectors and antenna cable.
|
| 2. |
Install the audio head unit.
|
| 3. |
Install the center fascia upper panel.
|
| 4. |
Connect the negative (-) battery terminal.
|
 Audio Unit Components and components location
Components
[AUDIO/CD/BLUETOOTH] (A Type)
Connector Pin Information
No.
Connector A
Connector B
1
Rear doo ...
 Speakers Repair procedures
Inspection
Troubleshooting of the speakers
When handling the speakers :
•
...
Other information:
Kia Sportage QL (2015-2026) Owners Manual: Driver's Attention
The driver must be cautious in the below situations for the system may not assist the driver and may not work properly. - Curved roads, tollgates, etc. - The surrounding of the sensor cover is dirty with rain, snow, mud, etc. - The rear bumper near the sensor is covered or obstructed with forei ...
Kia Sportage QL (2015-2026) Service Manual: Fuel Pressure Sensor (FPS) Description and operation
Description The fuel pressure sensor (FPS) is installed on the top of the low pressure fuel pump and measures the pressure in the low pressure fuel line.Based on the fuel pressure measured by the FPS and the amount of fuel consumed, the fuel pump control module (FPCM) determ ...
Copyright © www.ksportagegl.com 2015-2026


