Kia Sportage: Crash Pad / Steering Column Shroud Panel Repair procedures
[Steering column shroud upper panel]
|
Put on gloves to protect your hands.
|
| • |
Use a plastic panel removal tool to remove interior trim pieces
without marring the surface.
|
| • |
Be careful not to bend or scratch the trim and panels.
|
|
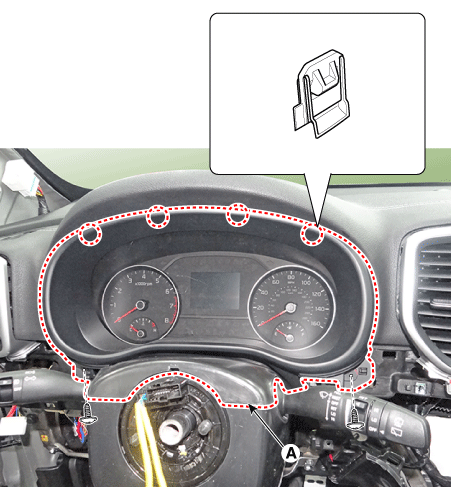
| 1. |
Remove the cluster fascia panel.
(Refer to Crash Pad - "Cluster Fascia Panel")
|
| 2. |
Loosen the mounting screws and remove the steering column shroud upper
panel (A).
|
| 3. |
Install in the reverse order of removal.
|
Replace any damaged clips.
|
|
[Steering column shroud lower panel]
|
Put on gloves to protect your hands.
|
| • |
Use a plastic panel removal tool to remove interior trim pieces
without marring the surface.
|
| • |
Be careful not to bend or scratch the trim and panels.
|
|
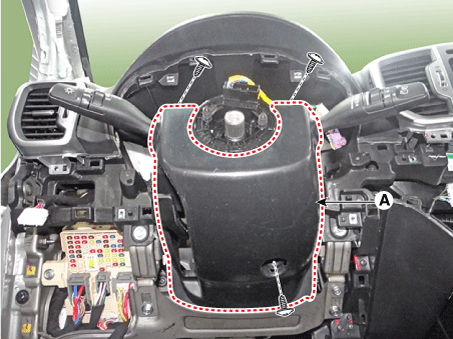
| 1. |
Remove the cluster fascia panel.
(Refer to Crash Pad - "Cluster Fascia Panel")
|
| 2. |
Loosen the mounting screws and remove the steering column shroud lower
panel (A).
|
| 3. |
Install in the reverse order of removal.
|
Replace any damaged clips.
|
|
Component Location
1. Steering column shroud lower
panel
2. Steering column shroud upper
panel
...
Component Location
[LH]
1. Crash pad side cover [LH]
[RH]
1. Crash pad side cover [RH]
...
Other information:
Specifications
Item
Specification
Model
AUDIO/CD/BLUETOOTH (A Type)
AUDIO/CD/BLUETOOTH (B Type)
Internal Amplifier
External Amplifier
Internal Amplifier
Powe ...
■ Example
Each symbol and specification on the air conditioning refrigerant label is represented
below :
1. Classification of refrigerant
2. Amount of refrigerant
3. Classification of Compressor lubricant
WARNING - Vehicles equipped with R-1234yf
Because the refrigerant is mildly infla ...


 Steering Column Shroud Panel Components and components location
 Crash Pad Side Cover Components and components location