Kia Sportage: Cylinder Block / Piston and Connecting Rod Repair procedures

Kia Sportage QL (2015-2024) Service Manual / Engine Mechanical System / Cylinder Block / Piston and Connecting Rod Repair procedures

Disassembly
  
In case of removing the high pressure fuel pump, high pressure fuel pipe, delivery pipe, and injector, there may be injury caused by leakage of the high pressure fuel. So don’t do any repair work right after engine stops.
  
Use fender covers to avoid damaging painted surfaces.
To avoid damage, unplug the wiring connectors carefully while holding the connector portion.
Turn the crankshaft pulley so that the No.1 piston is at top dead center.
  
Mark all wiring and hoses to avoid misconnection
1.
Remove the engine assembly from the vehicle.
(Refer to Engine and Transaxle Assembly - “Engine And Transaxle Assembly”)
2.
Remove the transaxle assembly from the engine assembly.
(Refer to Automatic Transaxle System - "Automatic Transaxle")
3.
Remove the drive plate.
(Refer to Cylinder Block - "Drive Plate")
4.
Install the engine to engine stand for disassembly.
5.
Remove the intake manifold.
(Refer to Intake and Exhaust System - "Intake Manifold")
6.
Remove the exhaust manifold.
(Refer to Intake and Exhaust System - "Exhaust Manifold")
7.
Remove the timing chain.
(Refer to Timing System - “Timing Chain”)
8.
Remove the A/C compressor.
(Refer to Heating, Ventilation Air conditioning - "Compressor")
9.
Remove the alternator.
(Refer to Engine Electrical System - "Alternator ")
10.
Remove the water temperature control assembly.
(Refer to Cooling System - "Water Temperature Control Assembly")
11.
Remove the balance shaft & oil pump.
(Refer to Lubrication System - "Balance Shaft & Oil Pump")
12.
Remove the ladder frame.
(Refer to Cylinder Block -"Cylinder Block")
13.
Check the connecting rod end play.
14.
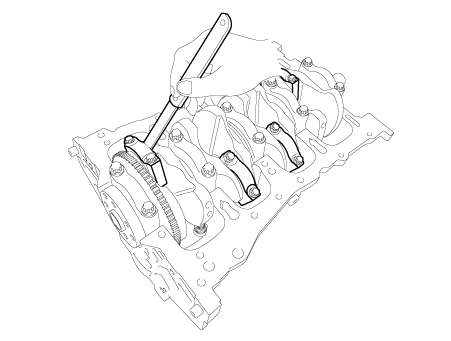
Remove the connecting rod caps and check oil clearance.
15.
Remove piston and connecting rod assemblies.
(1)
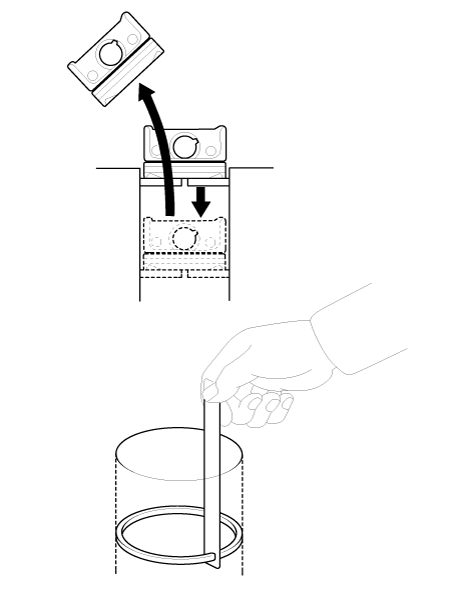
Using a ridge reamer, remove all the carbon from the top of the cylinder.
(2)
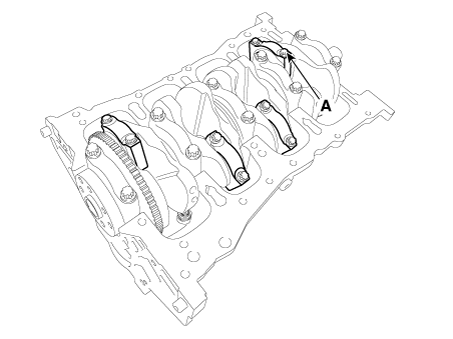
Remove the connecting rod bearing cap (A).

(3)
Push the piston, connecting rod assembly and upper bearing through the top of the cylinder block.
  
Keep the bearings, connecting rod and cap together.
Arrange the piston and connecting rod assemblies in the correct order.
16.
Check fit between piston and piston pin.
Try to move the piston back and forth on the piston pin. If any movement is felt, replace the piston and pin as a set.
17.
Remove piston rings.
(1)
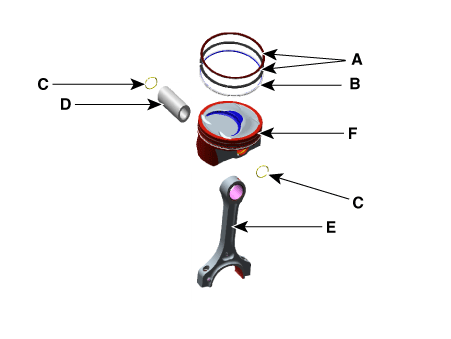
Using a piston ring expander, remove the 2 compression rings (A).
(2)
Remove the oil ring and coil spring (B) by hand.
  
Arrange the piston rings in the correct order only.
18.
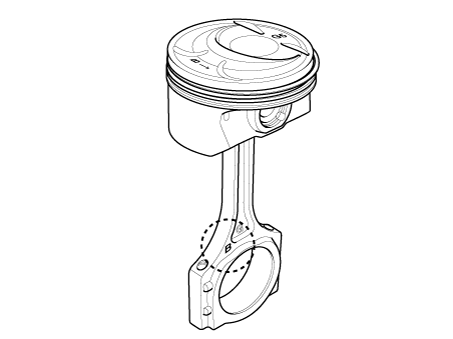
Disassemble the connecting rod from the piston.
(1)
Remove the snap ring (C) from the piston.
(2)
Remove the piston pin (D) from the piston.
(3)
Disassemble the piston (F) and connecting rod (E).

Inspection
Connecting Rod
1.
Check the connecting rod end play.
Using a feeler gauge, measure the end play while moving the connecting rod back and forth.
Side clearance :
Standard : 0.10 - 0.25 mm (0.0039 - 0.0098 in.)

If out-of-tolerance, install a new connecting rod.
If still out-of-tolerance, replace the crankshaft.
2.
Check the connecting road bearing oil clearance.
(1)
Check the match marks on the connecting rod and cap are aligned to ensure correct reassembly.
(2)
Remove 2 connecting rod cap bolts.
(3)
Remove the connecting rod cap and bearing half.
(4)
Clean the crank pin and bearing.
(5)
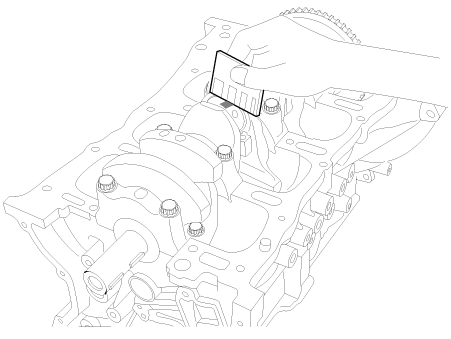
Place plastigage across the crank pin.
(6)
Reinstall the bearing half and cap, and torque the bolts.
Tightening torque
17.7 - 21.6 N·m (1.8 - 2.2 kgf·m, 13.0 - 15.9 lb·ft) + 88 - 92°
  
Do not turn the crankshaft.
Always use new connecting rod cap bolts. Connecting rod cap bolts are toque-to-yield bolts designed to be permanently elongated beyond the state of elasticity when torqued, so if the bolts are removed and reused, it may cause the bolts to break or fail to maintain clamping force.
(7)
Remove 2 bolts, connecting rod cap and bearing half.
(8)
Measure the plastigage at its widest point.
Standard oil clearance :
0.033 - 0.051 mm (0.00130 - 0.00201 in.)

(9)
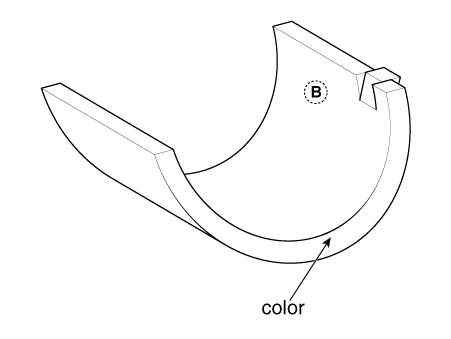
If the plastigage measures too wide or too narrow, remove the upper half of the bearing, install a new, complete bearing with the same color mark (select the color as shown in the next column), and recheck the clearance.
  
Do not file, shim, or scrape the bearings or the caps to adjust clearance.
(10)
If the plastigage shows the clearance is still incorrect, try the next larger or smaller bearing (the color listed above or below that one), and check clearance again.
  
If the proper clearance cannot be obtained by using the appropriate larger or smaller bearings, replace the crankshaft and start over.
If the marks are indecipherable because of an accumulation of dirt and dust, do not scrub them with a wire brush or scraper. Clean them only with solvent or detergent.
Connecting Rod Identification Mark

Connecting Rod Specifications
Class
Mark
Inside Diameter
a
A
51.000 - 51.006 mm
(2.00787 - 2.00811 in.)
b
B
51.006 - 51.012 mm
(2.00811 - 2.00834 in.)
c
C
51.012 - 51.018 mm
(2.00834 - 2.00858 in.)

Crankshaft Pin Identification Mark

Crankshaft Specifications
Class
Mark
Outside Diameter Of Pin
I
1
47.966 - 47.972 mm
(1.88842 - 1.88866 in.)
II
2
47.960 - 47.966 mm
(1.88819 - 1.88842 in.)
III
3
47.954 - 47.960 mm
(1.88795 - 1.88819 in.)

Connecting Rod Bearing Identification Mark

Connecting Rod Bearing Specifications
Class
Mark
Thickness Of Bearing
AA
Blue
1.512 - 1.515
(0.059528 - 0.05964)
A
Black
1.509 - 1.512
(0.05940 - 0.059528)
B
None
1.506 - 1.509
(0.05930 - 0.05940)
C
Green
1.503 - 1.506
(0.05917 - 0.05930)
D
Yellow
1.500 - 1.503
(0.05906 - 0.05917)

Selection Chart For Connecting Rod Bearings
Crankshaft Identification Mark
Connecting Rod Identification Mark
Assembling Classification Of Bearing
I (1)
a (A)
D (Yellow)
b (B)
C (Green)
c (C)
B (None)
II (2)
a (A)
C (Green)
b (B)
B (None)
c (C)
A (Black)
III (3)
a (A)
B (None)
b (B)
A (Black)
c (C)
AA (Blue)

3.
Inspect the connecting rods.
(1)
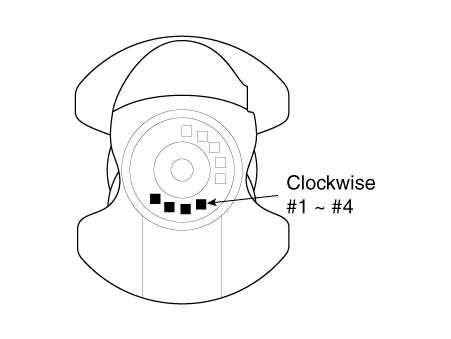
When reinstalling, make sure that cylinder numbers put on the connecting rod and cap at disassembly match. When a new connecting rod is installed, make sure that the notches for holding the bearing in place are on the same side.
(2)
Replace the connecting rod if it is damaged on the thrust faces at either end. Also if step wear or a severely rough surface of the inside diameter of the small end is apparent, the rod must be replaced as well.
(3)
Using a connecting rod aligning tool, check the rod for
Allowable bend of connecting rod :
0.05mm (0.0020 in.) or less for 100mm (3.94 in.)
Allowable twist of connecting rod :
0.10mm (0.0039 in.) or less for 100mm (3.94 in.)
Piston
1.
Clean piston
(1)
Using a gasket scraper, remove the carbon from the piston top.
(2)
Using a groove cleaning tool or broken ring, clean the piston ring grooves.
(3)
Using solvent and a brush, thoroughly clean the piston.
  
Do not use a wire brush.
2.
Check the piston-to-cylinder clearance by calculating the difference between the cylinder bore inner diameter and the piston outer diameter.
Piston-to-cylinder clearance :
0.020 - 0.040 mm (0.00079 - 0.00157 in.)
(1)
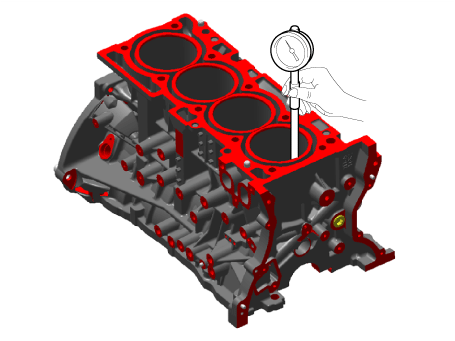
Using a cylinder bore gauge, measure the cylinder bore diameter at position in the thrust and axial directions.
Standard diameter :
88.00- 88.03 mm (3.4645 - 3.4657 in.)

  
Measure position points (from the bottom of the cylinder block) :
110.7 mm (4.3582 in.) / 160 mm (6.2992 in.) / 210 mm (8.2677 in.)
(2)
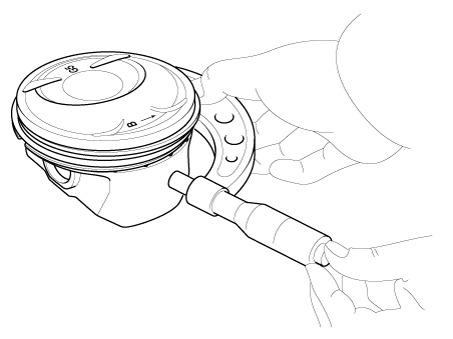
The standard measurement of the piston outside diameter is taken 17 mm (0.67 in.) from the top land of the piston.
Standard diameter :
87.960 - 87.990 mm (3.46229 - 3.46417 in.)

3.
Select the piston matching with cylinder bore class.
(1)
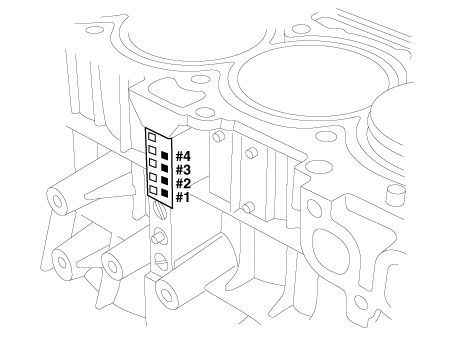
Check the cylinder bore size code on the cylinder block side surface.

Cylinder Bore Inner Diameter
Size Code
Cylinder Bore Inner Diameter
A
88.00 - 88.01 mm
(3.4645 - 3.4649 in.)
B
88.01 - 88.02 mm
(3.4649 - 3.4653 in.)
C
88.02 - 88.03 mm
(3.4653 - 3.4657 in.)

(2)
Check the piston size mark on the piston top face.

  
Stamp the grade mark of basic diameter with rubber stamp.
Piston Outer Diameter
Size Code
Cylinder Bore Inner Diameter
A
87.960 - 87.970 mm
(3.46229 - 3.46338 in.)
B
87.970 - 87.980 mm
(3.46338 - 3.46377 in.)
C
87.980 - 87.990 mm
(3.46377 - 3.46417 in.)

Piston Rings
1.
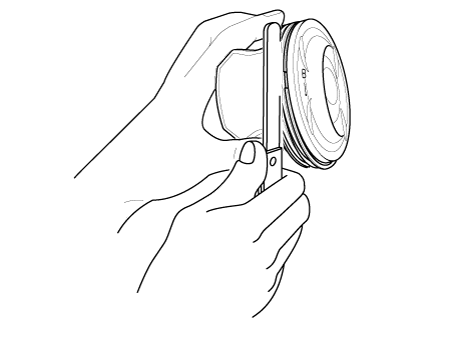
Inspect the piston ring side clearance.
Using a feeler gauge, measure the clearance between new piston ring and the wall of the ring groove.
Piston ring side clearance
Standard
No.1 : 0.050 - 0.080 mm (0.00197 - 0.00315 in.)
No.2 : 0.040 - 0.080 mm (0.00157 - 0.00315 in.)
Oil ring : 0.020 - 0.055 mm (0.00079 - 0.00217 in.)

If the clearance is greater than maximum, replace the piston.
2.
Inspect piston ring end gap.
To measure the piston ring end gap, insert a piston ring into the cylinder bore. Position the ring at right angles to the cylinder wall by gently pressing it down with a piston. Measure the gap with a feeler gauge. If the gap exceeds the service limit, replace the piston ring. If the gap is too large, recheck the cylinder bore diameter against the wear limits, If the bore is over the service limit, the cylinder block must be replaced.
Piston ring end gap
Standard
No.1 : 0.15 - 0.25 mm (0.0059 - 0.0098 in.)
No.2 : 0.37 - 0.47 mm (0.0146 - 0.0185 in.)
Oil ring : 0.20 - 0.40 mm (0.0079 - 0.0157 in.)

Piston Pins
1.
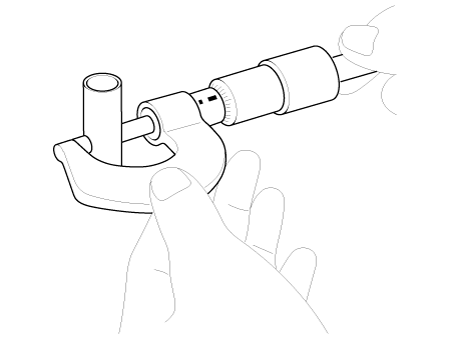
Measure the diameter of the piston pin.
Piston pin diameter :
21.995 - 22.000 mm (0.86594 - 0.86614 in.)

2.
Measure the piston pin-to-piston clearance.
Piston pin-to-piston clearance :
0.003 - 0.012 mm (0.00012 - 0.00047 in.)
3.
Check the difference between the piston pin diameter and the connecting rod bushing oil clearance.
Piston pin-to-connecting rod clearance :
0.005 - 0.016 mm (0.00020 - 0.00063 in.)
Reassembly
  
Thoroughly clean all parts to be assembled.
Before installing the parts, apply fresh engine oil to all sliding and rotating surfaces.
Replace all gaskets, O-rings and oil seals with new parts.
1.
Assemble the piston and the connecting rod.
Piston pin outer diameter :
21.995 - 22.000 mm (0.86594 - 0.86614 in)
Piston pin hole inner diameter :
22.003 - 22.007 mm (0.86626 - 0.86642 in)
Connecting rod small end inner diameter :
22.005 - 22.011 mm (0.86634 - 0.86657 in)
Interference :
-0.014 to -0.005 mm (0.0006 - 0.0002 in)
(1)
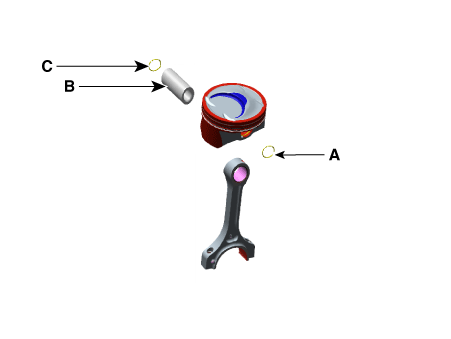
Install the snap ring (A) in one side of the piston pin hole.
(2)
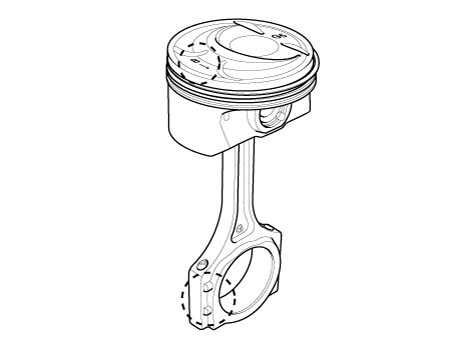
Align the piston front mark and the connecting rod front mark.

(3)
Insert the piston pin (B) into the piston pin hole and the small end bore of connecting rod.
Assembling Temperature Condition
Piston : 70 - 80°C (158 - 176°F)
Connecting rod & piston pin : Room temperature
  
Take care that piston pin is not damaged during reassemble.
When replace the piston pin, check the piston pin outer diameter and connecting rod small end inner diameter as below.
Be sure to keep the small end bore, piston pin hole & piston pin from being damaged and scratched when inserting the piston pin.
(4)
Install the snap ring (C) in the other side after inserting the piston pin.

  
Set the snap ring so that it contacts completely with the groove of the piston pin hole.
The snap ring must not be deformed from the installation tooling method.
2.
Install the piston rings .
(1)
Install the oil ring with coil spring by hand.
(2)
Using a piston ring expander, install the 2 compression rings with the code mark facing upward.
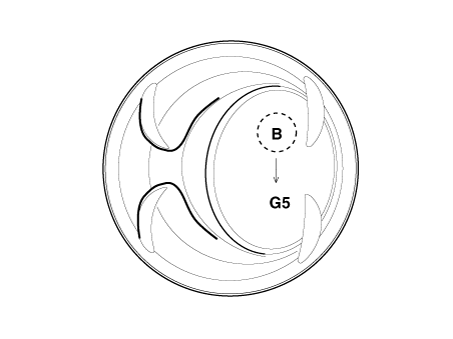
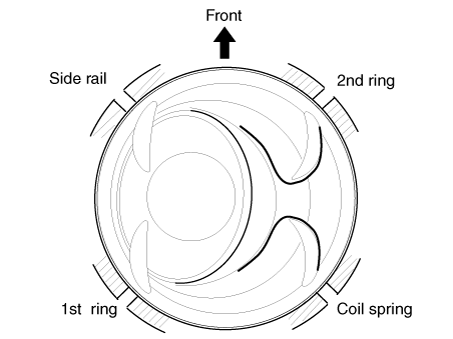
(3)
Position the piston rings so that the ring ends are as shown.

3.
Install the connecting rod bearings.
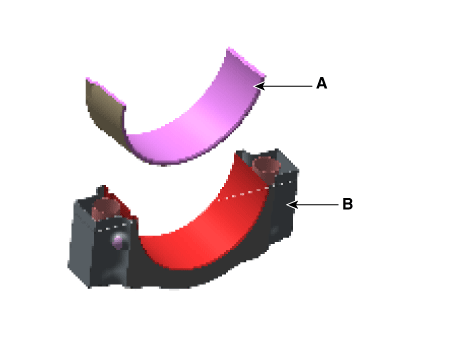
(1)
Align the bearing claw with the groove of the connecting rod or connecting rod cap.
(2)
Install the bearings (A) in the connecting rod and connecting rod cap (B).

4.
Install piston and connecting rod assemblies.
  
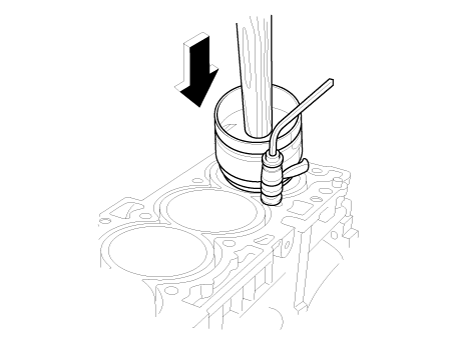
Before installing the pistons, apply a coat of engine oil to the ring grooves and cylinder bores.
(1)
Install the ring compressor, check that the bearing is securely in place, then position the piston in the cylinder, and tap it in using the wooden handle of a hammer.

(2)
Stop after the ring compressor pops free, and check the connecting rod-to-check journal alignment before pushing the piston into place.
(3)
Apply engine oil to the bolt threads. Using the SST (09221-4A000), install the rod caps with bearings, and torque the bolts.
Tightening torque
17.7 - 21.6 N·m (1.8 - 2.2 kgf·m, 13.0 - 15.9 lb·ft) + 88 - 92°

  
Maintain downward force on the ring compressor to prevent the rings from expanding before entering the cylinder bore.
Always use new connecting rod cap bolts. Connecting rod cap bolts are torque-to-yield bolts designed to be permanently elongated beyond the state of elasticity when torqued, so if the bolts are removed and reused, it may cause the bolts to break or fail to maintain clamping force.
5.
Check the connecting rod end play.
6.
Assemble the other parts in the reverse order of disassembly.
Rear Oil Seal Repair procedures
Removal 1. Remove the automatic transaxle. (Refer to Automatic Transaxle System - "Automatic Transaxle") 2. Remove th ...

Crankshaft Repair procedures
Disassembly    In case of removing the high pressure fuel pump, high pressure fuel pipe, delivery pipe, and in ...

Other information:

Kia Sportage QL (2015-2024) Service Manual: Specifications


Specification Item Specification Ultrasonic sensor Voltage rating DC 12 V Detecting range 11.8 - 47.2 in. (30 - 120 cm) Operation voltage DC 9 - 16 V ...

Kia Sportage QL (2015-2024) Service Manual: Sunvisor Components and components location


Component Location 1. Sunvisor 2. Retainer ...

Copyright © www.ksportagegl.com 2015-2024