Kia Sportage: Engine Control System / Intake Air Temperature Sensor (IATS) Repair procedures
Kia Sportage QL (2015-2026) Service Manual / Engine Control / Fuel System / Engine Control System / Intake Air Temperature Sensor (IATS) Repair procedures
| Inspection |
| 1. |
Turn the ignition switch OFF.
|
| 2. |
Disconnect the IATS connector.
|
| 3. |
Measure resistance between the IATS terminals 3 and 4.
|
| 4. |
Check that the resistance is within the specification.
|
|||||||||||||||||||||||||||||
| Removal |
| 1. |
Turn the ignition switch OFF and disconnect the battery negative (-)
terminal.
|
| 2. |
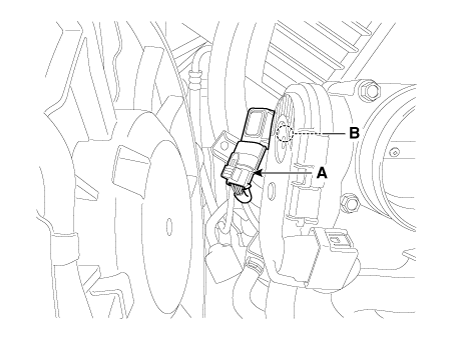
Disconnect the manifold absolute pressure sensor connector (A).
|
| 3. |
Remove the mounting bolt (B), and then remove the sensor from the intake
manifold.
|
| Installation |
|

| 1. |
Install in the reverse order of removal.
|
 Intake Air Temperature Sensor (IATS) Schematic diagrams
Circuit Diagram
Harness Connector
...
 Engine Coolant Temperature Sensor (ECTS) Specifications
Specification
Temperature
Resistance (kΩ)
°C
°F
-40
-40
48.14
-20 ...
Other information:
Kia Sportage QL (2015-2026) Service Manual: Rear Wheel Guard Repair procedures
Replacement Put on gloves to protect your hands. • Use a plastic panel removal tool to remove inter ...
Kia Sportage QL (2015-2026) Owners Manual: Tire pressure
Always observe the following: Check tire pressure when the tires are cold. (After the vehicle has been parked for at least three hours or hasn't been driven more than one mile (1.6 km) since startup.) Check the pressure of your spare tire each time you check the pressure of other ...
Copyright © www.ksportagegl.com 2015-2026
