Kia Sportage: Auto Head Lamp Leveling Device / Auto Head Lamp Leveling Unit Repair procedures
Kia Sportage QL (2015-2026) Service Manual / Body Electrical System / Auto Head Lamp Leveling Device / Auto Head Lamp Leveling Unit Repair procedures
| Inspection |
| 1. |
Ignition "ON".
|
| 2. |
Turn on the head lamp switch.
|
| 3. |
Check that the aim of the head lamp changes smoothly when the head lamp
leveling device switch is turned on.
|
| 4. |
If it does not operate well, check the connector and terminals to make
sure that they are connected.
If the terminals are bent, loose or corroded, repair them as necessary,
and recheck the system.
If the terminal is in good condition, move to the step 5.
|
| 5. |
Replace the head lamp assembly and check for proper operation.
|
| Removal |
| 1. |
Disconnect the negative (-) battery terminal.
|
| 2. |
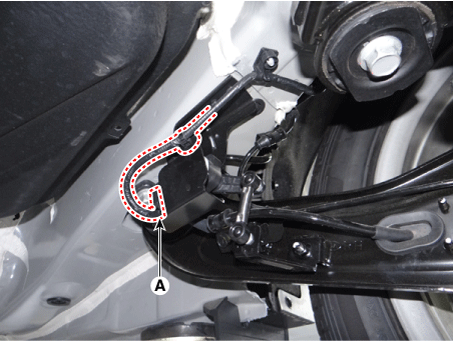
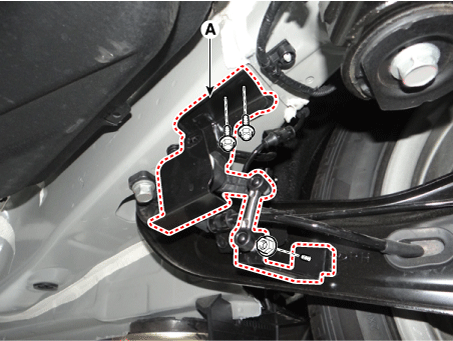
Disconnect the head lamp leveling unit connector (A).
|
| 3. |
Remove the head lamp leveling unit (A) after loosening the mounting
bolts and nut.
|
| Installation |
| 1. |
Connect the head lamp leveling unit connector after installing the head
lamp leveling unit.
|
| 2. |
Connect the negative (-) battery terminal.
|
 Auto Head Lamp Leveling Unit Description and operation
Description
According to driving environment and loading state of vehicle, head lamp lighting
direction is changed to keep the driver's visibility range and to protect the
dr ...
 Auto Head Lamp Leveling Unit Troubleshooting
Inspection with KDS/GDS
Initialization and diagnosis sequence by using KDS/GDS equipment.
The following is the summarized A/S procedure.
No.
Procedur ...
Other information:
Kia Sportage QL (2015-2026) Service Manual: Curtain Airbag (CAB) Module Description and operation
Description Curtain airbags are installed inside the headliner (LH and RH) and protect the driver and passenger from danger when side crash occurs. The SRSCM determines deployment of curtain airbag by using side impact sensor (SIS) signal. &n ...
Kia Sportage QL (2015-2026) Service Manual: Heated Oxygen Sensor (HO2S) Repair procedures
Inspection 1. Turn the ignition switch OFF. 2. Disconnect the HO2S connector. 3. Measure resistance between the HO2S terminals 4 and 5 [B1/S1]. Specification: 2.5 - 4.0Ω [20° ...
Copyright © www.ksportagegl.com 2015-2026
